I Want a Dutch Oven Cookbook!

I Want a Dutch Oven Cookbook! - Purchase your very own Dutch Oven Cookbook from Nimbus Publising

Sunday, December 16, 2012

Crack is Whack Christmas Crack!

Dutch Oven Detour (recipes that should have been included in the Dutch Oven Cookbook)


Wow - so sorry to have been away for so long - life has a funny way of getting in the way things...anyway glad to be back and with the holiday's just around the corner we're in full on DO (dutch oven) mode.  Oh...and in case you noticed we've encountered a few...ummm...challenges with our URL (www.thedutchovendiaries.com) - which you may have noticed isn't currently working - and if  you haven't noticed - shame on you!  Anywho - we're workin' on it - in the meantime, you can find us right here at www.thedutchovendiaries.blogspot.com.

So Christmas Crack seemed to burst onto the holiday baking scene last year - introduced to us by the very talented Kilted Chef.  The holiday baking scene hadn't experienced a frenzy like this scince Martha Stewart introduced us to cookie flooding!  Everyone was talking about it, it was even named the "must have" holiday treat of 2011 by Good Housekeeping magazine (totally made this up).  The interesting tidbit about this sweet treat is that it is made using saltine crackers (premium plus).  The crackers bring the salty to this highly addictive sweet'n salty snack.  Saltine crackers are baked with a brown sugar butter mixture that forms a toffee base, this is layered with chocolate, and then topped with candy cane pieces and nuts.

Sunday, September 16, 2012

L'Eggo My Eggo!

Waffles – (recipe adapted from) Vegetable and Supper Dishes, Pg. 171 – Mary C. Oxner (Mrs. S.W.)


When it comes to breakfast – no more waffling required.  We’ve found you a winning waffle recipe!  We’re not big breakfast eaters personally – in fact it was after Noon by the time we actually ate these…I guess that makes it brunch…or is it lupper?...that’s a debate for another day.

As children of the 70’s we are all too familiar with those round frozen waffles from a box – you know – the one’s they used to fight over in the commercials – what the heck is an Eggo anyway?  Well these waffles are a far cry from the frozen variety – dense, yet light and airy with a nicely browned, crispy exterior.  This recipe is pretty basic – and was easy to prepare.  In fact, this was our first time making waffles (well…aside from the Hampton Inn breakfast bar – does that count?) and we had no challenges.  If you wanted to, you could mix it up a little by adding cinnamon, chocolate chips or even pumpkin pie spice to add a little autumnal aroma to your waffles (tis the season).  We’re looking forward to trying some variations of this recipe next time around. 


Peach Me - I'm Dreaming!


Peach Conserve – (recipe adapted from) Pickles and Preserves, Pg. 223 – Lois J. Himmelman (Mrs. Thomas)


It’s peach season!  This one’s been on our to do list for a while – with visions of peaches dancing in our heads, we decided to give it a go.  Conserve is basically a type if Jam that is processed by steeping fruit in sugar just long enough to extract the flavor from the fruit and for the sugar to penetrate.   Honestly with so many different types of preserves, jams, spreads, jellies, conserves – someone needs to write Jam making for dummies.  We don’t necessarily understand the difference between all the different types of preserves, but one thing we do know is that this shiz is good.

This recipe is made with a mixture of peaches and oranges, and does not use any pectin for thickening.  Although there is a subtle citrusy flavor, the peaches are the true star of this conserve.  This recipe thickens naturally through the cooking process and produces a beautiful golden coloured spread, full of peachy-keen goodness.  One of our Facebook Page followers suggested adding candied ginger – something we’ll definitely try next time.

Saturday, September 15, 2012

Gooseberrylicious


Spiced Gooseberries - (recipe adapted from) Pickles and Preserves, Pg. 325 - Evelyn V. Zinck (Mrs. B.E.)


Who knew that Nova Scotia was the home of the succulent, somewhat tart and very interesting gooseberry?  Oh, you did?  Well – this is the first WE’VE heard of it.  Better late than never as they say. Prior to our DO adventure, we had merely sipped the sweet gooseberry nectar tucked away in some delicious New Zealand Sauvignon Blanc, and from time to time lingered over the imported yellow domestic kiwi/grape cross breed at Sweet Basil or Saege as a dessert garnish.  Our blogging journey has led us to 2 wonderful facts - A) Nova Scotia's gooseberries are just as lovely as their New Zealand 3rd cousin on their father's side; and B) The possibilities are endless!

We started with a simple jam, thanks to Mister Bernardin's wise bible of all things canning. Although nice - it didn't blow our socks off and Gaylin Westin likely won't be launching a line President's Choice Gooseberry Jam anytime soon.

But...thank goodness we didn't stop there.  We then made a mini batch of the DO's spiced gooseberries, thanks to Peties’ sensational co-worker (a.k.a. Lobster Lady) who hooked us up with a bounty of gooseberries.  It was love at first taste!  Although described as “tasty with roast beef or cold cuts” in the Dutch Oven Cookbook – spiced gooseberries, which offers a sweet-tart flavor, infused with aromatics spices such as cinnamon and cloves – would be the perfect accompaniment to any meats of fish.

We were so blown away that we searched high and low for a new stash of this not-so-exotic-anymore berry, to make a full batch.  Another little known fact - NS gooseberries are very, very hard to find!  17 phone calls later, a trip to Halifax’s 2 farmers markets, and a response to a kijiji ad - we were back in business.  As an aside – if you have a friend, co-worker, temperamental neighbor, or old high school acquaintance that you haven’t seen in 20 years and with whom you perhaps had a mere stormy friendship at best – put your differences aside and become their new best friend.  Buy them lunch.  Send random Edible Arrangements to them.  Mow their lawn.  If it means they’ll pay you back in their private reserve of gooseberries – DO IT!  That’s all we’ll say on the subject.

Never in our wildest dreams did we think that anything could come close to our coveted rhubarb relish.  Well, Bing Bong!  Move Over Rhubarb.  Hello spiced gooseberries.  It was, well - gooseberryliscious.

Sianara applesauce; 'forget about it' mint jelly; we like ya cranberry, but you should know…we’ve been seeing another condiment.  And his name is Spiced Gooseberry!

Ingredients:
4 quarts gooseberries (washed and stemmed)
7 cups sugar
2 cups vinegar (scant)
1 Tbsp Cinnamon
1 Tbsp Cloves
1 Tbsp All Spice


Directions:
Place ingredients in large pot.  Mix well and boil over medium heat until thickened – about 1-1.5 hours.  Stir frequently.  Pour into sterilized jars and process for 10 minutes.


Sunday, September 2, 2012

Petah's Pineapple Peach Salsa


Pineapple Peach Salsa - Dutch Oven Detour (recipes that should have been in the Dutch Oven)


 So for years now, Peter has been obsessed with Pineapple Peach Salsa – found only at Target (or Tar-jay as it’s known to its biggest fans).  Target sure hit the bullseye with this one!  It takes everything that is great about regular salsa – fresh tomatoes, a little burn from jalapeños and then BAM!  - They hit ya with the taste bud tingling sweetness of peaches and pineapple.  A flavor sensation - a party in your mouth – fruit and vegetables unite in celebration of salsa lovers around the world!

On shopping excursions to the US of A, Peter regularly stocks up; it’s not uncommon to come home with a half dozen jars of this liquid gold (ok – a dozen, but who’s counting!).  He also enlists the help of many other willing cross border shoppers to keep his pantry stocked.  With Target’s impending arrival in Canada – one can only hope that they will carry what is surely on its way to becoming known as the best salsa evah – and likely world salsa domination.  In the meantime however, we’ve come up with our own version made with all locally sourced ingredients – except for the pineapples of course (if anyone has Nova Scotia grown pineapples, surely let us know!   - Don’t call me Shirley! (HaHa!  Airplane fans unite!).  We digress…

Here’s how we did it…

Ingredients:


4 cups chopped tomatoes (peeled and seeded – see tip below)
2 cups chopped peaches (peeled – again, see tip below)
2 cups chopped pineapple (see tip below already!  Just kidding, we have no tip for this one)
1 red pepper finely chopped
1 cup chopped red onion
3-4 jalapeno peppers, finely chopped (we’re wimps so only used three and definitely removed all seeds!)
Juice of one lemon
¼ cup white balsamic vinegar
¼ cup sugar
1 tsp salt
1 cup tomato sauce
¼ Cilantro (optional)

Directions:

TIP!!!  Blanch your tomatoes and peaches to easily remove the skins.  Boil a big ol’pot of water; throw your tomatoes and peaches in (not all at the same time silly) for 30 to 60 seconds (until skin begins to wrinkle).  Remove and immediately place in ice bath.  Skins should be easily removed (sometimes it works, sometimes it doesn’t – when it doesn’t; expletives are permitted - but oh when it does…well, it can only truly be described as a foodie “A-ha moment – eat your heart out Oprah – when you know better you do better – beam us all up to the mother ship” kinda moment!).  Like turkey bacon changed Oprah’s life – blanching your tomatoes and peaches will change yours!


 Place all your prepared ingredients in a large pot and boil gently bently for 5 minutes.


Ladle into sterilized jars and process for 15 minutes (250 ml jars) or 20 minutes (500 ml jars).

Yields approximately six 500 ml jars.


Sunday, August 19, 2012

Thumbs Up!


Jam Filled Thumbprint Cookies! - Dutch Oven Detour (recipes that should have been in the Dutch Oven)


They go by many names – Jam Drops, Thimble Cookies, Bachelor Buttons - but we just call’em Thumbprints!  Peter remembers his Mom making these cookies growing up – the crispy sugar coated exterior, moist and chewy on the inside and a dollop of fresh homemade preserves in the centre.


We’ve been busy the season preparing lots of homemade preserves.  How can you possibly add more carbs to an already sugar laden jam you ask? – well put it on sugar laden cookie of course.   No worries, with the humidity we’ve been having here lately, you don’t even have to move to sweat off the calories.

Although this isn’t a Dutch oven recipe, it’s a great treat to showcase some of our delectable Dutch Oven preserves.

Jam Filled Thumbprint Cookies

Ingredients:

2 Cups flour
½ Cup brown sugar
1 Cup butter
3 egg yolks
¼ tsp salt
1 tsp vanilla
¼ Cup white sugar (for rolling cookies)
Jam for filling centres

Directions:

Preheat oven to 350 degrees.   


In mixer, cream butter and sugar, add egg yolks, vanilla and salt.  Mix well.  Gradually add flour until blended.  


Using a Tbsp size cookie scoop – scoop dough into evenly sized portions and place onto cookie sheet.   


Roll the dough into 1 inch balls.  Roll balls in sugar and using the back of tsp size measuring spoon, make an indentation in the centre of each ball.  Partially bake cookies for 8 minutes.  Remove cookies from oven.   


Using a small spoon, fill the centre of each cookie with your favorite preserves.  Return to the oven for 6-8 minutes, or until lightly browned.  Let cookies cool on a wire rack. 


Eat’em up yum!

Monday, May 21, 2012

Petah's Rhubarb Crisp

Rhubarb Crisp - Dutch Oven Detour (recipes that should have been in the Dutch Oven)


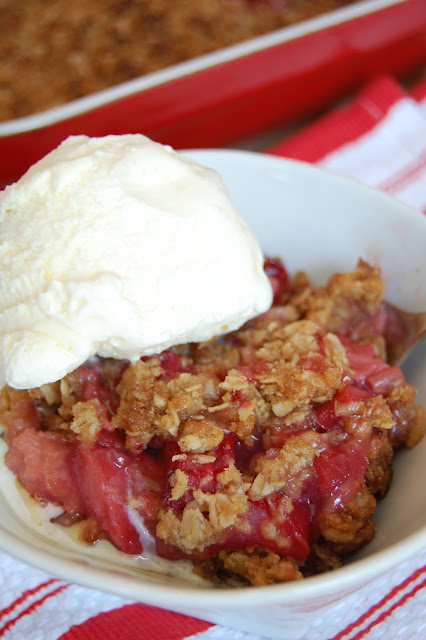
There aren't nearly enough rhubarb recipes in The Dutch Oven Cookbook - and absolutely no crisp recipes. Surprising for an eastcost cookbook. Yesterday we got our first haul of rhubarb of the season. Beautiful ruby red rhubarb - we just couldn't risist using it to bake something up today. We settled on rhubarb crisp - tart rubarb works perfectly with the sweet, crisp struesel like topping of a crisp. Peter, somewhat of rhubarb addict, created this simple and quick recipe. Perhaps something to be including in a Dutch Oven Cookbook follow-up - "the lost recipes"? Definitely, maybe!?


Petah's Rhubarb Crisp
4 cups chopped rhubarb (3/4 inch thick, cut crosswise)
2 Tbsp flour
1/2 cup sugar

1/2 cup butter (chilled, cut into pieces)
1/2 cup flour
1 cup oats
1/2 cup brown sugar
1/2 tsp cinnamon

Combine first three ingredients in an 8.5 x 11 baking dish. Blend butter and flour together using a pastry cutter until small pieces form. Add remaining ingredients and work mixture together using your hands until large clumps form. Sprinkle mixture evenly over top of rhubarb mixture. Bake at 400 degrees for 40 mintues until topping is lightly browned and rhubarb is tender. Serve with vanilla ice cream or whipped cream.


Saturday, April 7, 2012

Holy Bunzzzz!!

Hot Cross Buns – (recipe adapted from) Bread and Rolls, Pg. 70 – Antoinette E. Smith (Mrs. A. E.)


In addition to being a song that everyone rocked out to on their elementary school recorder, hot cross buns are also tasty treat. Hot Cross Buns, traditionally baked on Good Friday, are a sweet spiced bun usually made with raisins or dried fruit, originally marked with a cross to signify a Christian symbol, but now it’s mainly because we like frosting! In olden days the cross would have been imprinted onto the bun during baking rather than using frosting…AND in olden days, a glimpse of stocking was looked on something shocking, now heaven knows, anything goes! Accordingly to folklore, if you make hot cross buns on Good Friday, they will remain good for the rest of the year. Holy Bunz!! We’ll never know as ours won’t last that long – and we never eat expired bread, holy or not. If you try this, we recommend a thorough mold inspection.

We have a confession to make – we pretty much know nothing about making yeast bread. After attempting an earlier post – the Tea Ring – not once, BUT twice – and having to bring Peter’s mamma in for reinforcement – we walked away from the yeast and never looked back. It was a difficult breakup, but definitely best for everyone involved.

We’ve been taunted by the thought of baking yummy breads and buns – and the Dutch Oven is loaded with them. So today! Good Friday – the day reserved for baking and eating hot cross buns – is the day of reckoning! We’ve decided to face our yeast fears and kick it in the bunz!

Soooooooooo..the Dutch Oven recipe for hot cross buns starts out by making something called a yeast sponge (also known as a starter) – ya – I know right!?…well this was too much too soon, so we called on our good friend Martha for some tips on how to simplify the process a bit – based on her suggestions we’ve made a couple of changes to this recipe. Oh yeah – and if you been following our adventures – you are likely aware of our stance on raisins – so we’ve decided to use cinnamon chips instead – YaY!

Hot Cross Buns

Ingredients:

2 cups milk
2 packages active dry yeast
3 eggs (beaten)
½ cup butter (melted)
¾ cup sugar
7 ½ cups flour (sifted)
1 ½ tsp salt
1 ½ cups cinnamon chips (or raisins if that’s your thing)
½ tsp nutmeg
¼ tsp cinnamon
1 egg (white only)
1 tbsp water

Icing

2 cups icing sugar
3 tbsp milk
1 tsp vanilla
Pinch of salt

Directions:

In a small saucepan – heat milk to 110 degrees, pour into mixer bowl fitted with dough hook. On low speed add sugar, yeast (proof according to directions), butter, salt, nutmeg, cinnamon and eggs. Add flour, 1 cup at a time until mixture is combined and smooth dough is formed.


Add mix-ins (cinnamon chips or raisins) and mix. Turn dough onto lightly floured surface and knead to incorporate mix-ins. Coat a large bowl with butter and shape dough into ball and place in prepared bowl. Cover with plastic wrap and allow to rise for 1 hour or until doubled in size.


Generously butter a baking dish or cookie tray. Turn dough onto surface, knead briefly and divide into 20-24 equal pieces, shape into tight balls. Place in prepared baking dish about ½ an inch apart. Cover and let rise until doubled in size, about 1 hour.

Preheat oven to 375. In a small bowl, whisk together 1 egg white and 1 tbsp of water. Brush tops of buns with egg-white wash. Bake 20-22 minutes, rotating halfway through and until golden brown.


Allow buns to cool for 30 minutes. Whisk icing ingredients together and transfer to piping bag. Pipe icing onto buns in the shape of a cross – or just pour it onto like a glaze.


Thursday, April 5, 2012

Please Pass the Potatoes...

Scalloped Potatoes – Vegetable and Supper Dishes, Pg. 163 – Stella A. Lohnes (Mrs. J. A.)


What’d you do with the potatoes?! That’s what your friends and family will be asking when they try these fantastical potatoes! Scalloped potatoes are a popular maritime side dish – extremely popular with a ham dinner. Commonly referred to as a gratin, scalloped potatoes consist of thinly sliced potatoes in a cream sauce usually baked in a shallow dish and topped with breadcrumbs and/or cheese to form a crusty topping as it bakes.

The Dutch Oven Cookbook provides a simple classic version of this dish – the same version many of our Mom’s used to make for Sunday dinner. While it’s a fine recipe, we tested a few different ones over the years that have stepped it up a notch or two by adding some unexpected ingredients. Our favorite recipe for scalloped potatoes comes from . This recipe uses some added ingredienthttp://www.blogger.com/img/blank.gifs like fresh thyme and chicken stock to step up the flavor factor– so for this post we present a Dutch oven / America’s Test Kitchen mash up! Two recipes – five potatoes – one flavor sensational side dish!

Scalloped Potatoes

Ingredients:


5-6 medium potatoes (thinly sliced)
1 medium onion finely chopped
2 cloves are garlic (minced)
1 Tbsp fresh thyme (minced) – chives would work nicely as well
2 bay leaves
1 tsp Salt
¼ tsp fresh pepper
1 cup chicken stock
1 cup milk (cream can be used for a creamier sauce)
1 cup cheddar cheese
¼ cup panko bread crumbs

Directions:

Thinly slice 5 medium potatoes (a mandolin is a great time saver for this). Using a large pan, sauté onion for about 5 minutes, until softened (shouldn’t be browned). Add garlic, thyme, salt and pepper to onion, sauté for about a minute. Add potatoes, chicken stock, milk and bay leaves - simmer for 10 minutes until potatoes are softened. Transfer the potatoes to a baking dish (9x11 works well). Sprinkle cheese and breadcrumbs on top. Bake at 425 degrees for 20 minutes.


With this quick, easy and delicious recipe – we guarantee that the folks around your dinner table will be asking you to – please pass the potatoes!

Wednesday, April 4, 2012

When You're Rollin' Out the Dough...

Old Fashioned Molasses Cookies – Old Lunenburg Recipes, Pg. 24 – Belle Backman Mack (Mrs. S.E. Mack)


Ugh…feeling slightly nauseous...WAY too much cookie dough. We will likely slip into a temporary cookie dough coma when we complete this post. We feel it necessary to preface this blog post with a word of warning – This cookie dough is dangerously good! We mean sit down and eat it with a spoon good…not that we would ever do that…don’t judge. In fact, we think it’s safe to say that this cookie dough in its raw form is better than the actual baked cookie.

There’s something about Mary…and something about molasses cookies and the way the smell of the molasses and spices drifting from the oven transport you back to grandma’s kitchen. This particular cookie is a soft and airy variation of the molasses cookie with a strong molasses flavor…kinda reminds us of a homemade version of a bear paw cookie.

Not so surprisingly, this recipe doesn’t give any instruction on how to actually prepare the cookies for baking. We suspect the original method used was to roll the dough out and cut the dough into shapes. Although this isn’t a crisp gingerbread type cookie, these type of molasses cookies were often cut into circular shapes with a biscuit cutter and sprinkled with a little sugar. Well…as everyone knows…when you’re rollin’ out the dough, you must make sure to roll it slow (Bibbi Bobka style) – well we weren’t in a Bibbi Bobka kinda mood today. So instead we rolled the dough into small balls (I used a 1.5 tbsp scoop), coated them with sugar (why not), and gently pressed them down with the palm of our hand. While baking, the cookies formed a natural circular shape, rising slightly. The sugar created a nice sweet crunchy exterior with a soft, moist interior loaded with molasses-sy goodness.


If you’re looking for a chewy type of molasses cookie (which we actually prefer), this isn’t it. But for those looking for a great old fashioned molasses cookie that will remind many of the kind granny used to make – you’ve found it!

Old Fashioned Molasses Cookies

Ingredients:


2 Cups Molasses (that’s a whole lotta molasses)
1 Cup of Shortening
1 tsp Nutmeg
½ tsp Cloves
2 Dessert Spoons Cinnamon (I know right?! Figure it out, we had too!)
2 Desserts Spoons Ginger
2 Dessert Spoons Baking Soda
1 Egg (beaten)
5 Cups Flour (unsifted)

Directions:

Combine first 7 ingredients in a pot on the stovetop over medium heat. Allow to boil for one minute. Transfer mixture to electric mixer. Beat on medium speed for 5 to 10 minutes, allowing to cool. Once cooled the mixture will resemble chocolate frosting (mmmmm frosting…). On low speed, beat in the egg and flour. To prepare the cookies for baking you can use the method we chose above, or go with the more traditional method of rollin’ out the dough…just remember – when you roll the dough too quick, Bibbi Bobkas make you sick! Actually its more likely that eating too much raw cookie dough will make you sick.


Now entering cookie dough coma….ZZZZZzzzzzzzzzzzzzzzzzz…

Bake at 350 degrees for 10-15 minutes. EAT.