I Want a Dutch Oven Cookbook!

I Want a Dutch Oven Cookbook! - Purchase your very own Dutch Oven Cookbook from Nimbus Publising

Monday, October 24, 2011

C is for Cookie!

Halloween Sugar Cookies - Dutch Oven Detour (recipes that should have been in the Dutch Oven)

There’s no sugar cookie recipe in the Dutch Oven Cookbook! What up with that Dutch Oven Cookbook? In light of this glaring oversight - we bring you this brief intermission from the Dutch Oven Diaries to present you with this Halloween Special Edition Post!

What is it about a sugar cookie? The SUGAR perhaps? What’s not to like? In all seriousness though, for us, it’s all about the presentation. Peter has great memories of the sugar cookies his Aunt Carolyn would painstakingly paint by hand every Christmas. As a young lad he was mesmerized by the colourful cut-out cookies that were “almost” to pretty to eat. Little individual masterpieces in the shapes of Santa’s, snowmen and Christmas trees were layered with brightly coloured icings. There’s no doubt that Aunt Carolyn’s cookies left a lasting impression on this foodie in training.

Although our methods may be a little different than Peter’s Aunt Carolyn’s, the end result remains the same. A simple cookie is turned into a delicious, whimsical piece of foodie art. As anyone who’s made cookies like this knows, it’s a lot of work and takes a lot of time! However the end results are so worth the effort, especially having the opportunity to share them with the little ones (or big ones) in your life, who receive them with wide eyed excitement.

Here’s how we do it…

Martha Stewart’s Ideal Sugar Cookie Recipe

Royal Icing for Sugar Cookies (also see video on this page for icing technique known as flooding).


As a wise foodie once said: “C is for Cookie, that’s good enough for me. Arr arr-umm-umm-umm!” – Cookie Monster

Enjoy and have fun!

But Beware! Beware of the sugar cookie cramp...similar to tennis elbow or carpel tunnel. After hours of flooding and decorating, your hand is sure to seize up like a narled witches claw. Even at the risk of permenant disfigurement, it is well worth the pain.

The Dutch Oven Diaries will be on hiatus for a week or so as we’re heading to the Big Apple for some food, fun and adventure! If you’d like to follow our foodie fun in NYC join our facebook page at www.facebook.com/thedodiaries!

Happy Halloween!

Friday, October 21, 2011

Say YES to the Dress...ing

(recipe adapted from) Dressing – Meat & Fowl, Pg. 134–Violet D. Allen (Mrs. L)

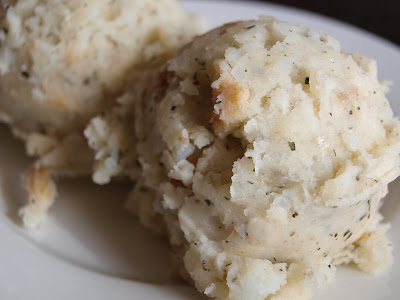
Dressing, as it’s referred to on the east coast of Canada is known as stuffing to many North Americans. By many it's considered to be the hands down starring side dish next to the bird around the holiday dinner table. Turkey dinner just isn’t turkey dinner without it.

This recipe is very similar to the recipes that our mom’s make and likely that our grandmother’s made. The base begins with seasoned mashed potatoes, combined with sautéed onions and apples for sweetness, dried breadcrumbs for texture, and of course summer savory! Summer savory in Atlantic Canada is what sage is to the rest of the world. Summer savory is what makes dressing...well...dressing!

Ingredients:

2 medium potatoes
3 cups dry bread crumbs
1 medium onion (chopped finely)
1 small apple (diced)
3 Tbsp butter
1 tsp salt
1 tsp summer savory
¼ tsp pepper

Directions:

Boil potatoes until tender in salted water. Drain and mash with 2 tbsp butter. Add dried bread crumbs. Sauté onion and apple in 1 tbsp butter until softened. Add onions and apple to potato/bread mixture along with salt, pepper and summer savory. Mix until well combined. Transfer dressing to baking dish.


Dutch Oven Tips & Tricks:

This recipe is quite small; we’d recommend doubling it to serve any more than 4 people. It can also be modified in case you prefer a higher potato ratio to bread – just increase the amount of potato and use fewer bread crumbs. Speaking of bread crumbs – we used regular old white sandwich bread (America’s test kitchen suggestion) and dried the bread crumbs at a low temperature (200 degrees) in the oven for about 20 mins. We found this recipe is a little light on the summer savory – those who like it, like it lot (like our Keith’s) – we suggest you season to your own taste. Lastly – the recipe in the Dutch Oven suggests roasting the dressing in the cavity of your bird – does anyone do this anymore? We prefer to dress our bird rather than stuff it, so we simply transferred the stuffing to a baking dish for storage and heated in the oven to serve with the turkey or chicken.

Regardless of whether you stuff your bird or dress it, we recommend you say YES to the dress…ing.

Wednesday, October 19, 2011

Petah's First Chicken Dance!

Roast Chicken – Meat & Fowl, Pg. 134 – Violet D. Allen (Mrs. L)


It seems hard to believe, but Peter’s never roasted a whole bird. Chicken parts, slabs of beef, hunks of ham – not a problem, been there done that – but never a bird. Maybe it was watching his mom prepare the annual thanksgiving turkey and the day long process that made it appear too daunting. Perhaps it’s the fact that you can purchase a pre-roasted bird from the supermarket for the same price, without the work. Or maybe it’s a generational thing – although Jan’s tangoed with a turkey, she’s never cha cha'd with a chicken – turns out many of our other friends haven’t cooked a bird either. Who knows?! In any case, it turns out it’s not daunting at all and it’s much tastier than any store bought bird.

The DO recipe was pretty basic – S&P & Butter; so Peter Martha’d it up a bit. Here’s what you’ll need:

Ingredients:

5-6 lb Chicken
1 Tbsp butter
Salt & Pepper
2 medium onions (peeled and sliced crosswise, ½ inch thick)
1 lemon (halved)
3 cloves garlic (peeled and slightly pressed to open)
4 Springs fresh thyme
1 Lemon

Directions:

Preheat oven to 350 degrees. Remove the giblets and/or organs from the cavity of the chicken (ick!). Wash bird thoroughly with cold water. The Dutch Oven suggests to singe the bird if necessary, but unless you’ve just freshly plucked your bird, hopefully this won’t be necessary. Dry thoroughly with paper towel. Sprinkle the cavity of chicken liberally with salt and pepper. Place sliced onions on the bottom of your roasting pan (Peter used a round cast iron dutch oven). Place lemon, garlic and thyme in the cavity of the chicken and place atop the layer of onions. Bring chicken legs forward and tie together. Spread the softened butter over the chicken and sprinkle liberally with salt and pepper. Suggested roasting time is 20 minutes per pound (or until the breast temperature reaches 180 degrees and the skin is golden brown). Occasionally baste chicken while roasting. When chicken is done let rest for 10 to 15 minutes to allow juices to settle before carving. Pan drippings can be reserved to prepare gravy.

This little chickie was tender and juicy. The aromatics of lemon, thyme and garlic gave this bird an edge over the competition (whoever that is). So if you've been on the fence about roasting a bird - get out of the coup, call on your inner chicken and DANCE!

Blueberry Blunder!

Blueberry Cake - Cake. Pg. 254 - Lila E.D. Kinley (Mrs. J.J.)


Mmmm…blueberries. When it comes to blueberry desserts, it’s hard to imagine anything comparing to the sensational, one of a kind, blueberry buckle (see recipe here). Jan loves her buckle, and when Jan finds something she likes, she tends to stick with it. She knows what she likes and likes what she knows (pssst…she only thinks she knows what she likes). Blueberry season means taking advantage of any and all DO blueberry recipes (even blueberry pudding - not the custard kind, but the other one)….but for that we’re procrastinating and will come at a later date – maybe next season. It took a bit of convincing to get Jan to think outside of her blueberry box…but alas, we bring you blueberry cake!

A seemingly simple cake - a handful of ingredients. Same old same old…right? WRONG! 2 cups of sugar should have made us question this petite gateau. Then – combine the fact that it has double the amount of sugar of any normal cake recipe; with sour milk…we were ready to throw in the towel. But then we thought to ourselves…No! You can’t quit. Weird and wacky as the ingredient volumes are, it will not get the better of us. We trudged onward.

We saw it through, but oh what a blueberry blunder. This cake’s got issues...first off it was as heavy as a brick, and sweet enough to send any adult into a sugar coma and any kid climbing the walls and ceiling. All the blueberries settled to the bottom of the cake, and it turned out extremely dense with little rise. Probably more suitable for a doorstop, we dressed it up with a little simple vanilla glaze and voila! – It looked good enough to eat…and we did, we have no shame – if it’s sweet and has frosting, chances are we’ll eat it.


It did inspire us however to seek out alternative recipes, a quest to find the perfect blueberry cake! Peter and Jan checked with their people, and their people’s people, and so on. After reviewing all the family recipe archives – we decided upon Jan’s great aunt Gladdys’s recipe. Pulled from the secret recipe files of Jan’s Nanny, it was similar to some of Peter’s family recipes.

And that was our placebo second throwdown. And oooooh, it was delicious. Winner winner chicken dinner we say. Light and fluffy, topped with a sweet crunchy streusel topping – blueberry cake perfection! More is more we say - we topped this one with a little lemon glaze – blueberry plus lemon = yummiliscious.

Gladdy’s Blueberry Cake:

Ingredients:

1 cup sugar
½ cup butter
2 eggs (lightly beaten)
2 cups flour
3 tsp baking powder
¼ tsp salt
1 tsp lemon juice
2/3 cups sour milk (we just used regular milk)
Zest of 1 lemon (optional)

Directions:

Crème 1 cup sugar and ½ cup butter together, add 2 beaten eggs. Sift together 2 cups flour, 3 tsp baking powder, ¼ tsp salt. Add the dry to the sugar/butter/egg mixture – alternating with wet, per normal batter rules of the universe. Add zest of one lemon (optional). Add 1-2 cups berries to batter…{we prefer wild…but cultivvated would be fine}.

Topping: ½ cup brown sugar and 1 tsp cinnamon – topping gets added over batter.

Bake at 350 degrees for 50 mins…or until baked through. Recommended square pyrex or Bundt pan (greased and floured).


Saturday, September 10, 2011

Miss Peachberry Pie!

Fruit Pie (Peach & Blueberry) – Pies & Pastries, Pg. 196 – Lois J. Himmelman (Mrs. Thomas)


Here she is Boyzzzzzzzzz….Here she is Girlzzzzzz…..It’s PeachBerry Pieeeee!!!

Well, what better way to showcase two fabulous in-season Nova Scotia fruits, than with a DO fruit pie, mash-up style - peaches and blueberries in one sensational dessert.

The mash-up doesn’t end with the ingredients: Oh, no! It gets better…we used our favorite Julia Child’s no-fail easy as pie crust (find recipe here), and collaborated with Mr. Tyler Florence, Mizzzzz Martha Stewart, and tried to incorporate as much of the ambiguous “fruit pie” recipe from the DO as possible. Okay – the least you could have done is told us HOW MUCH FRUIT TO PUT IN IT!!!! We always feel guilty not doing the DO recipe straight up, verbatim, to help understand the essence of the historic Nova Scotia recipes, and then if we feel adventurous and time permitting, go a second round with a more current comparison and see what provides the grooviest outcome (in our humble opinion of course). But in this case, the recipe was very vague and we felt it not a blasphemy to the coveted book to go free-style on the inaugural testing.

Being a couple of fussy Gen X self proclaimed foodies, and trying very hard to jump on the natural, local, organic, sustainable bandwagon, the whole concept of translucent fish-egg cavier-like pearlescent balls, known to the rest of the world as tapioca, to use as a thickener…is well….icky. And, more scientifically, the tapioca seemed more appropriate for a straight up blueberry pie – by us inviting peaches to the party, we felt it justified to side with the professionals and go with corn starch as a thickener.

Tyler Florence’s recipe called for 2 lbs skinned and sliced peaches, and a pint of blueberries. Martha’s fruit pies called for 8 cups peaches or 5 cups blueberries…so for our mash up, we would like to introduce to the world, the one, the only, the Toast of Mayfair, second cousin, twice removed of Strawberry Shortcake, Miss PeachBerry Pie!

Peach & Blueberry Pie:

12 medium sized peaches and 2-ish cups Blueberries (enter tip….parboiled for 1 min or so and ice bath for easy pealin’)
½ lemon’s juice
½ cup sugar (tyler called for ¼ cup…our peaches were slightly under ripe so we added more)...
1 ½ tbsp corn starch
Tyler adds bit of butter – we forgot, so dollopped minis inside the lattice holes


Lattice work compliments of Mz. Martha, see instructions here.

Brush pastry with egg wash, place pie on cookie sheet, and back at 400 degrees for 50-60 minutes.


Saturday, August 20, 2011

Jam Session

Strawberry Jam – Pickles & Preserves, Pg. 324 – Frances Frittenburg (Mrs. M. W.)


Okay, so maybe not the best idea the first time making Jam to choose a recipe from The Dutch Oven. Alas we were so eager to use our freshly picked strawberries and thought what better way to preserve this perfected locally grown fruit than to use the recipes our grandmothers would have used. Well it seemed like a good idea…unfortunately The Dutch Oven Cookbook doesn’t come with a grandmother to walk you through the recipe.

The strawberry season is short in Nova Scotia, but oh so sweet! Don’t be fooled by those strawberries in the plastic clamshell in the Supermarket – while they look tasty enough, they don’t compare to the juicy, succulent flavor of a locally grown berry.

We began our strawberry jam making process in the garden, literally – we picked our own berries for this recipe. We ventured down Nova Scotia’s South Shore to Indian Garden Farms near Hebville. A U-pick farm and market with all kinds of locally grown goodies. At a buck fifty a pint, it makes it well worth the gas and extra effort – plus there’s just something so satisfying from taking produce you pick with your own hands and transforming it into something so delicious!


As we mentioned – The Dutch Oven’s recipe for strawberry jam is an old one, much like the kind of jam our grandmothers would have made before pectin was commercially available in supermarkets. The idea is that the fruit and sugars are cooked longer to ensure the jam reaches a gel stage by use of its own natural pectin. Although we followed the instructions implicitly and even referred to our Bernardin cookbook, we didn’t seem to achieve the correct gel stage. We’ve since received many tips on the subject – from adding an apple during the cooking process to performing an ancient granny jam dance around the pot. We welcome any suggestions and wish you better luck should you attempt this one.

Ingredients:

2 quarts crushed berries (8 cups)
½ cup water
6 cups sugar

Directions:

Combine berries and water. Add 2 cups of sugar. Bring to a rolling boil. Boil hard for 3 minutes. Add 2 more cups of sugar. Bring to a rolling boil. Boil for 3 minutes. Add 2 more cups of sugar. Bring to a rolling boil. Boil for 3 minutes. Pour into sterilized jars and process.


Dutch Oven Tips and Tricks:

As mentioned above we did receive a few suggestions after the fact which may give you a leg up should you try this one. Try throwing an apple in during the cooking process. Apples have lots of natural pectin which may help with the thickening. Our berries may have also been slightly over ripe, after spending the day trolling the South Shore for berries and hangin’ out people watchin’ at the Tastee Freeze in Hebville – we were much too tired to make Jam and ended up doing it the next day. Bernardin suggests using a mix of ripe and less ripe berries as the less ripe ones would have more pectin. That’s about all we’ve got!

We loved the flavor of this jam. Through the longer cooking process you end up with a jam that is slightly darker in colour with a rich caramelized flavor. Although slightly runny it’s still mighty tasty on a biscuit. No doubt it will also make a great sauce on ice cream. Oh!, we almost forgot – although our Jam may not have turned out the best – it does look fabulous in these new canning jars we recently discovered. Weck (pronounced Veck) jars are produced in Germany and come in a wide variety of funky shapes and sizes – a welcomed change from the traditional canning jars. Check’em out here – and for our local readers – check out Weck Canada, a supplier right here in Nova Scotia!


Punch it up a Notch!

Rhubarb Punch – Beverages & Canapés, Pg. 33 – May Eisenhauer (Mrs. D. M.)


Who knew that rhubarb could be such a versatile vegetable? We can now add drinks to our ever-growing list of recipe uses for rhubarb.

Punch, a beverage originated in India (pronounced “panch”) – tomata/tomato – potata/potato, came to us in the early seventeenth century from England. Punch is normally made with a fruit juice – not sure who takes credit with coming up with the idea to use rhubarb (a vegetable) – but we’ll pretend it was a Nova Scotian (a rhubarb lovin’ German settler perhaps). The German’s were apparently really into their punch as well. Pronounced “punsch”, the German version often added wine or liquor to the recipe – definitely seeing the Nova Scotia connection here…

Summer has made a late entrance this year in our end of the world – but with the sun shinin' and the temperature risin', it’s the perfect time to prepare this cool and refreshing, sweet and tart summer drink. If you’re lucky, you can still pick up some fresh rhubarb from your local farmers’ market (we spotted some last week at the Halifax Seaport Market), otherwise frozen will work just fine.

Ingredients:

1 quart chopped rhubarb (4 cups)
1 quart water
1/3 cup orange juice
4 Tbsp lemon juice
1 ½ cups sugar syrup (equal parts sugar and water – dissolve sugar in boiling water)
Few grains of salt
1 pint (2 cups) mineral water (or ginger ale)

Instructions:


Cut rhubarb into small pieces and cook in 1 quart of water until rhubarb is soft. Strain liquid through cheesecloth (if you’re fresh out of cheesecloth, a strainer will work just fine). Discard rhubarb. Add orange juice, lemon juice, sugar syrup and salt to rhubarb juice. When ready to serve – pour over ice in punch bowl and add mineral water of ginger ale. Allow to get very cold. Makes 8 regular glasses, or 24 punch glasses.

Dutch Oven Tips & Tricks:

This recipe was pretty straight forward to prepare, no big surprises. We reduced the recipe to half as we didn’t want a large amount and this worked just fine. This recipe is delicious as is, however if you want to really get the party started you could punch it up a notch, German style, by using sparkling wine instead of mineral water or ginger ale. Check out Wines of Nova Scotia for some great local options.

Saturday, June 25, 2011

Beebop-a-reebop Rhubarb Pie!

Rhubarb Custard Pie – Pies & Pastries, Pg. 200 – Jean C. Rafuse (Mrs. E. W.)


Anyone else get that little song stuck in their head whenever you’re cooking with rhubarb? Mama’s little baby loves rhubarb rhubarb – bebop-a-reebop rhubarb pie! Yeah-No? Probably just Peter…

One of the first veggies of the harvest season in Nova Scotia is Rhubarb! We’re all over this celery-like tart vegetable. We recently loaded up during a trip to the Halifax Seaport Farmers’ Market and began our rendezvous with rhubarb. Top of our to-do list - rhubarb pie!

We had lots of rhubarb so we decided to double-double our rhubarb pleasure and double-double your delightment by preparing two different rhubarb pie recipes. The Dutch Oven’s Rhubarb Custard Pie will be the focus of this post. The second, from our favorite go-to cookbook – America’s test kitchen’s Rhubarb Custard Pie coming soon…

The first step to making a perfect pie is choosing the pie crust – the foundation to any great pie! Check out our Easy as Pie post for a couple of excellent suggestions. For this particular pie we used Julia Child’s Classic Pie Dough recipe. You’ll need to blind bake your pie crust for this one…and we don’t mean bake your pie crust while blind-folded – Yikes! – no need for third degree burns and a visit to the emergency room. Blind baking is the process of pre-baking your pie crust – a common process for custard or cream pies to ensure a flaky and golden pie crust. After placing the dough in the pie dish, cover with a double layer of foil (ensuring the crust is completely covered to avoid over-browning). Pie weights or pennies are then placed in the middle of the crust to ensure the bottom of the crust doesn’t bubble and weaken. Bake at 375 degrees for 35-40 mins.

Despite a few reservations during the preparation of this recipe, it was delicious. The ruby-red rhubarb custard filling was perfectly tart - combined with the sweetness of the mile-high meringue topping made this pie a blue ribbon winner for sure!

Ingredients:

2 cups choppe
d rhubarb (we added an extra cup)
3 eggs (separated)
1 cup sugar
1 tbsp butter
1 tbsp cornstarch

Instructions:

Combine sugar and cornstarch and mix with chopped rhubarb. Cook mixture in a double boiler until creamy. Add butter, mix. In a bowl lightly beat egg yolks and slowly add rhubarb mixture to beaten egg yolks. Return mixture to double boiler and continue to cook until thickened. Pour into prepared pie shell. Using the egg whites prepare a meringue.


No recipe was provided for the meringue, so we used this one from America’s Test Kitchen’s Family Cookbook. A little fussy, but delicious and worth the extra effort. If you’re not overachievers like we are, just whip your egg whites with some sugar and have at it.

Ingredients:

1/3 cup water
1 tbsp cornstarch
4 egg whites
½ tsp vanilla
½ cup sugar
¼ tsp cream of tarter

Instructions:

Bring the water and the cornstarch to a simmer in a small saucepan over medium-high heat, whisking frequently. When the liquid turns translucent and begins to bubble, remove it from the heat (ours got really thick).

Whip the egg whites and vanilla in an electric mixer on low speed until frothy. Mix the sugar and cream of tartar together, then add it to the egg whites, 1 tbsp at a time. Increase the speed to medium and whip the egg whites until soft peaks form. Add the cornstarch mixture to the whipped egg whites, 1 tbsp at a time, and continue to whip until the egg whites are glossy and form stiff peaks.

Drop dabs of meringue evenly around the edge of the pie and spread around the centre. Use the back of a spoon to create attractive peaks in the meringue. Return the pie to the oven until meringue is golden.


Dutch Oven Tips & Tricks:

While not everything made sense to us in this recipe…it worked. We weren’t convinced that a double boiler is necessary. The same results should be able to be achieved using a regular pot directly on the stove top. This recipe is a little light on the rhubarb, using a standard 9 inch pie pan, we used 3 cups instead of the recommended 2, and still found it a little light on the filling.


If you like rhubarb (or even if you don’t – Jan thought she didn’t like rhubarb until she had this pie) – get your bebop on and fix yourself a rhubarb pie!